After installing the Apocalypse drivers, a new page is added to your Display Properties control panel, called Apocalypse 3Dx. The Apocalypse 3Dx Display Properties page provides options for turning Direct3D acceleration on and off, and for tuning Apocalypse 3Dx behavior.
To access the Apocalypse 3Dx Display Properties page:
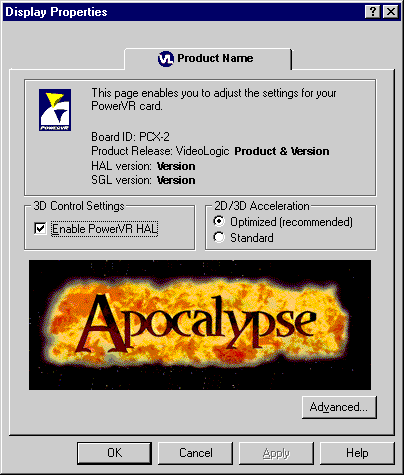
* The above image is a generic Apocalypse image. The textual details and the graphic will be different on your software.
This is used to turn on and off the PowerVR Hardware Abstraction Layer (HAL). The HAL provides the interface between the PowerVR hardware, and the Direct3D software it is running. Turning off the PowerVR HAL temporarily stops PowerVR from accelerating Direct3D, allowing you to run Direct3D applications or games through software, or through another 3D accelerator.
This switches between maximizing PowerVR acceleration, which is used for most modern systems, and ensuring that the works with older 2D graphics cards. If you want full PowerVR acceleration, select Optimized. If you notice problems with rendering, if textures are corrupted or missing, or if your computer crashes, then try setting this to standard.
If you have an older 2D card, please make sure you are running the latest drivers for it. For example, running version 3.63 or above of Matrox card drivers can usually enable Optimized PowerVR acceleration.
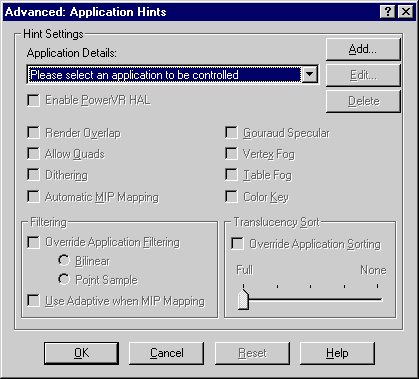
The Apocalypse 3Dx Advanced page enables you to optimize Apocalypse 3Dx performance and quality for specific applications. It overrides the equivalent settings made by the application when run, and, although most applications do not require any advanced settings, you can add, edit or remove your own settings according to the descriptions given below.
At the Apocalypse 3Dx Display Properties page, click the Advanced button. The following window is displayed:
To add an entry to the application list:
Enable PowerVR HAL - is used to turn on and off the PowerVR Hardware Abstraction Layer (HAL) for this application if it uses Direct3D. The HAL provides the interface between the PowerVR hardware, and the Direct3D software it is running. Turning off the PowerVR HAL temporarily stops PowerVR from accelerating this application if it is a Direct3D application, allowing you to run it through software, or through another 3D accelerator.
Render Overlap - controls the way in which the hardware and software interact when rendering 3D. Turn Render Overlap off if your screen is updating slowly, with symptoms such as menus or dialog boxes not appearing, otherwise leave it on to improve performance.
Allow Quads - enables PowerVR to process sets of triangles as single, four-sided objects. Turn this off if there are distorted objects on the screen, or leave it on to improve performance.
Dithering - smoothes the transition between areas of different color in 16-bit modes. Turning Dithering on improves image quality, but may reduce frame rates.
Automatic MIP Mapping - improves image quality as an object moves into the distance. If textures are missing or corrupted, turn Automatic MIP Mapping off.
Gouraud Specular - gives shiny highlights to an object. If you experience banding or low frame rates, turn Gouraud Specular off.
Vertex Fog - makes objects disappear into the distance as if through fog. If you experience banding or low frame rates, turn this off.
Table Fog - takes the fog value from a lookup table in PCX2, to render whole fog scenes. Turning this on improves image quality, but may reduce frame rates.
Color Key - is used for transparent textures.If the software isn’t actually working, or black outlines appear around the edges of objects, try turning Color Key on.
Override Application Filtering - forces a filtering method for an application. Generally you will get a better display with Bilinear on. Some games that are not compatible with bilinear filtering might show ‘joins’ between textures, in which case Point Sample will improve the display.
Use Adaptive when MIP Mapping - turns bilinear filtering on or off for an application. Generally you will get a better display with this feature switched off, so that you are using full bilinear filtering when MIP Mapping. Some games that are not compatible with bilinear filtering might show ‘joins’ between textures, in which case switching this on will improve the display.
Override Application Sorting - is a specialized PowerVR feature, which you can switch on to optimize between accuracy and performance. If you find an application is running slowly, try reducing the translucency sort. However, most applications should be able to run a Full Translucency Sort without affecting frame rates.
To edit an entry on the application list:
Deleting an entry from the list removes its PowerVR Display Properties settings, so that the game’s own settings are used.
To delete entries from the application list:
You can reset an entry to its default PowerVR settings. If you want remove an application’s settings completely, delete the settings by following the steps given above.
To reset entries on the list: